How To Add Google Analytics 4 To Shopify [2024]

Without data, making improvements to your Shopify store is like playing pin the tail on the donkey.
Thankfully, Google Analytics is one of the most powerful (and free) ways to measure several eCom performance metrics.
Done right, a Shopify Google Analytics integration allows you to learn more about your customer’s browsing behavior, discover their shopping habits, adjust your website to make more sales, and more.
However, Google Analytics isn’t the most intuitive platform out there. If you’re new to ecommerce, it can be somewhat tricky to master.
In this guide, we’ll show you how to add google analytics to your store and how to get started using it to improve your shopping experience and drive more revenue.
Let’s not mess around!
Why You Need to Add Google Analytics to Shopify
If you owned a physical store, you could observe your customer’s in action. You could interact with them and learn about their motivations, figure out what products they like, and so forth.
Online this isn’t the case. That’s why collecting data and studying relevant KPIs is the digital replacement for this traditional owner/customer interaction.
Data can help you analyze gaps in your ecom sales funnel, build a picture of how customers behave on your site, figure out your weak points, and optimize your store for conversions and sales.
While Shopify’s analytics are undoubtedly useful, Google Analytics packs more of a punch - plus, you’re going to need it if you’re thinking about running Google remarketing ads.
How to Add Google Analytics to Shopify
We’re going to cover two methods for connecting Google Analytics to Shopify:
- The Classic method (known as Universal Analytics)
- The New method (known as Global Site Tag)
If you’re just starting, we’d recommend going with the Classic method. It’s super easy, and you’ll be up and running in a couple of minutes.
Thankfully, Stilyo's Co-founder Ruth breaks down both methods in this short video:
https://www.youtube.com/watch?v=EbNBa_zdNpc
And if you want step-by-step text instructions to go along with the video, you'll find them below (plus some bonus tips for how to get the most from your metrics near the end!)
The Classic Method (Add Universal Analytics to Shopify)
This old school method of setting up Google Analytics won’t allow you to track things like app installs and downloads. But for 99% of Shopify stores, that’s not an issue since you probably only care about your website.
Here are four simple steps to get going:
1. Set Up a Google Analytics Account
- Hop over to the Google Analytics homepage and create a new account (You can log in with your regular google account if you have one).
- Click ‘Start Measuring’ and then enter your account name.

2. Create a Universal Analytics Property
- On the next page, you’ll be prompted to set-up a ‘Property.’
- Enter ‘[your store name] + universal’ so you’ll be able to identify the Property at a later date.
- Then click ‘Show Advanced Options’ to open the dropdown menu.

- From here, turn on the option to ‘Create a Universal Analytics Property.’ This step ensures Google will give you a tracking code that integrates easily with Shopify (i.e., one that starts with ‘UA-’’.
- Enter your Shopify URL. Choose ‘Create a Universal Analytics Property Only’ and hit ‘Next.’

- On the next page, you’ll be prompted to enter your business information.
- Once you’ve done that and accepted Google’s terms and conditions, you’ll be redirected to the page with your brand new tracking code:

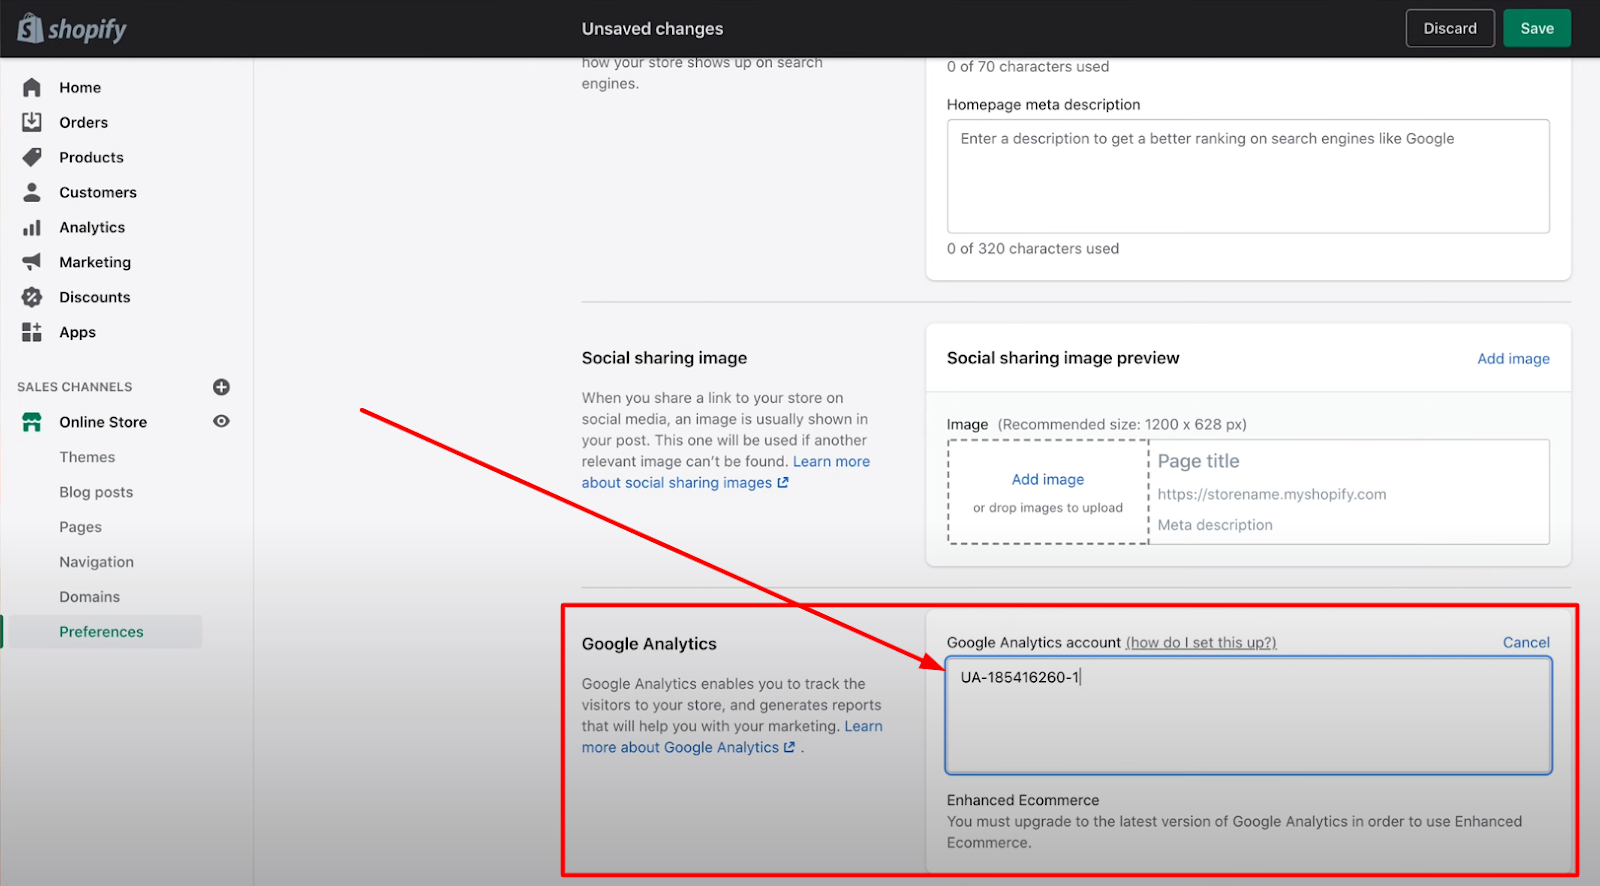
3. Copy and Paste Your Code into Shopify
- Once you’ve created your Tracking ID, copy the code (begins with UA-) and jump over to your Shopify Admin.
- In the right-hand menu, click ‘Online Store.’ Then hit ‘Preferences’ from the dropdown menu. Then scroll down until you see ‘Google Analytics’ and paste your code into the box.
- Click ‘Save.’
4. Test Your Shopify Google Analytics Integration
The last step is to make sure everything is working correctly.
- View your store in one tab and hop back over your Google Analytics account in another tab.
- On the homepage of your Analytics account, you should see yourself showing up as an ‘Active user.’

Congratulations! Your Google Analytics account is successfully integrated with your Shopify store!
The New Method (Add Global Site Tag)
The Global Tag (gtag) is the new method for integrating your Shopify store with Google Analytics.
Google introduced the global tag to make it easier to use your data across all of its services such as Analytics, Google tag manager, Adwords, Firebase, etc.
At the time of writing, Shopify doesn’t make it as easy to integrate using this method. However, It’s not very difficult.
So, if you want to go the global site tag route, here’s how:
1. Remove Any Existing UA Codes
The first thing you’ll need to do is remove any Universal Analytics codes you‘ve used previously. (if you haven’t used any skip to step two)
- To do this, jump into your Shopify dashboard. Click ‘Online Store’ on the right-hand panel. Then click ‘Preferences.’
- Scroll down until you find ‘Google Analytics’ and delete any codes you’ve previously pasted there.
2. Create A New Property in Google Analytics
- Go to your Google Analytics Dashboard. In the left-hand panel, click ‘Admin.’ Then click ‘Create Property’ at the top of the middle column.

- On the next screen, add a name for your Property and then hit ‘Next.’

- Now you’ll be redirected to your new homepage (which looks different from method one). To add our new analytics tag to your Shopify store, click on ‘Web.’

- Next, enter your website URL and your Stream name. Then click ‘Create Stream’

- On the following page, under ‘Tagging Instructions,’ choose ‘Global Site Tag’ and copy the code to your clipboard.
As you can see, Google requires that we add this code to the <head> of every page. While this sounds daunting, Shopify makes it pretty easy.
3. Add the ‘Global Site Tag’ to your Shopify Theme
One word of caution for this step: if you’re running a store with traffic and customers, we recommend you don’t edit your ‘Live’ theme.
Instead, simply duplicate your theme and make edits to the code on the ‘unlive’ copy. This means it’s no biggie if things go awry.
With that in mind, let’s keep moving.
- Go back to your Shopify admin and navigate to ‘Online Store.’
- Navigate to the 'Themes'.
- Click ‘Actions’
- Click ‘Edit Code’ from the dropdown menu to open your theme’s code.

- Next, Click ‘theme.liquid’.

- Once you’ve opened ‘theme.liquid’, press 'Ctrl + f' (or command + f on iOS) to open the search box.
- Type ‘/head’ into the search box to navigate to the correct section.
- Paste the gtag you copied from Google Analytics above the 'close' of the head (denoted by </head>)

- Click ‘Save’
- View your online store in a new tab.
- In another tab, return to Google Analytics to see if you’re showing up in the live view (note: it can take up to 30 minutes for this integration to start working)
Google Analytics Account Hierarchy
Sometimes the hierarchy of a Google Analytics account can get a bit confusing. Especially if you're new to it. So, here’s a quick run-through of the three tiers if you've been unsure so far.
- Account: This is your access point for Google Analytics. You can have multiple websites/stores under one account. These are known as ‘Properties’.
- Property: A property is a website, mobile application, or device from which you collect data. (i.e. your Shopify store). This data can be represented in multiple ways known as ‘views’.
- Views: A ‘view’ is your access point for reports. These reports could be an overview of all site data, Adwords data for your store, data related to a specific sub-domain, or many other things.
Optimizing Google Analytics for eCommerce
Okay, once you’ve got your basic Shopify Google Analytics integration complete, it’s time to take it one step further by enabling ecommerce analytics.
This will allow you to track useful ecommerce-specific metrics like user data like purchases, popular products, and more.
Here’s how:
- In your Analytics dashboard, click Admin in the bottom left corner.
- Navigate to the ‘View’ you want.
- In the view column, click ‘Ecommerce Settings.’
- Set Enable Ecommerce to ON.
- Click ‘Save’.
You’ll now be able to view ecommerce specific data by going to Conversions>Ecommerce>Overview.

Using Shopify Google Analytics to Improve Your Business
Ok, so you’ve set up Google Analytics for Shopify. What’s next?
If you’re like most people, you probably feel a little overwhelmed by the sheer amount of data available to you in Google Analytics.
So let’s break down the fundamental reports you should use to improve your store:
1. Acquisition Reports
Acquisition reports show you how visitors found you and arrived on your site.
Understanding how users came to your site is crucial because it sheds light on what marketing tactics work best for you.
For example, acquisition lets you determine which channel is:
- Driving the most traffic
- Bringing highly-engaged shoppers
- Creating the most sales
The acquisition tab can also show you what domains link to your site and drive visitors via the ‘all referrals tab.’
You can use Acquisition data to inform your marketing strategy.
For example, suppose that...
- Your Shopify blog is pulling in lots of organic traffic - you might decide to invest more in writing articles.
- Lots of other websites are linking to yours - perhaps there’s an unexploited opportunity for collaboration there.
- Spending money on paid ads is delivering lots of traffic, but none of the visitors are buying - maybe it’s time to reconsider your targeting.
2. Audience Reports
Audience reports shed light on the demographics, interests, and some value of your store’s visitors.

There’s a number of metrics that can help inform your ecommerce strategy here:
- New users - % of visitors who are visiting your store for the first time
- Country - the countries where you visitors reside
- Language - the languages your visitors speak
- Age group - how old your visitors are
- Operating System - what type of operating system visitors use (ex. iOS vs. Google)
Taking all of this information into account can help you do things like:
- Figure out which countries your most interested audiences are from and adjust your ad spend or logistics accordingly.
- Uncover which demographics are spending engaging with your store and double down on your marketing campaigns aimed at them.
3. Behavior Reports
The behavior reports show you what your site visitors are doing on your site. For example, you’ll have access to metrics like:
- Pages per session: the average number of pages viewed by visitors
- Average session duration: how long visitors are spending on your store
- Bounce rate: the number of visitors who leave your site after viewing just one page

More advanced metrics like the behavior flow report lets you see the paths visitors regularly take on your website - from landing on your site to leaving.
Plus, there’s a bunch of useful site speed and technical metrics too. So, you can always make sure your site is loading quickly.
Using behavior reports, you can, for example, determine the effectiveness of your landing pages and make adjustments that lead to higher conversion rates.
4. Ecommerce/Conversion Reports
Under conversions, you’ll find your eCommerce reports. While Shopify analytics are great, using Google Analytics allows you to go a step further.

Ecommerce tracking can help you discover things like:
- What products your customers are buying and how much they’re spending
- How many visitors are converting into paying customers
- The points at which and probable reasons why many potential customers don’t convert
- How many visits or time on average is needed to convert a visitor into a customer
As you start to make sales, conversion data will help you refine your ecom sales funnel. For example, analyzing the data might help you understand:
- If offering free shipping will allow you to increase your profit margin at checkout
- What kinds of products or collections customers like the most - so you can place these on your homepage.
- How adding upsells and cross-sells affects your conversion rate, order value, and overall revenue
- How to Improve your product pages by looking at metrics like the % of users who added to the cart against those who viewed it on the site.
5. Campaigns
Obviously, one of the most important things to keep tabs on is your marketing campaigns.
Using Google’s campaign URL builder, you can quickly and easily track your campaign performance with a trackable URL.

Just create a link by adding the relevant information, and Google will give you a trackable link in return.
When you use these URL’s for your marketing campaigns (email, search ads, etc.) Google Analytics will automatically recognize and tag the campaigns.
To view the data on how your campaigns are performing, all you need to do is navigate to Acquisitions > Campaigns.
Go Forth And Collect Data!
Google Analytics can be intimidating for budding Shopify entrepreneurs. But the rewards are totally worth the effort needed to get set-up.
This guide is by no means comprehensive. However, the aim is to show you how to get started with Google analytics right away.
As I’m sure you know, getting started is often the hardest part. But starting often sets off a snowball effect that’ll transform you into a Google Analytics pro within a couple of weeks.
So, what are you waiting for? Go add Google Analytics to your store, and start collecting valuable data today!
Now over to you! Do you use Google Analytics for Shopify? What metrics do you find most helpful? Let us know in the comments below.

.png)
